Home Improvement
Ideal Security Camera Types for Your Family

Home security solutions improve the safety and security of your home. That is why it makes sense to have security cameras installed, so you can keep an eye on your property even when you’re elsewhere. Even if you spend long hours at work, having security cameras in your residence can help you look after your loved ones.
Here are the ideal types of security cameras that are a common sight in residential areas.
Indoor and Outdoor Options:
Two of the main categories for home security cameras include indoor and outdoor models. You can find several subcategories under them. Outdoor CCTV camera systems are sturdy and weather-resistant. That is the primary difference between indoor and outdoor models. Some buyers make the mistake of getting a series of indoor cameras, thinking that they can designate a couple of them for outdoor use anyway. Doing that, though, will compromise the cameras and lead to permanent damage. That’s why you need to be careful about choosing your indoor and outdoor CCTV solutions.
Wired Security Cameras
You’ll also encounter wired CCTVs when you shop for indoor and outdoor home security cameras. The models are linked to a central recording device, usually by an ethernet cable. They are often dome cameras that you see on ceilings and are capable of capturing a wide field of view inside the home.
Wireless Security Cameras
Wireless or wi-fi cameras connect to the wi-fi network and store video content in the cloud. The cameras are easy to install. Since they’re wireless, you don’t need a cable to transmit the feed. However, you still need to keep these models plugged in to ensure they continue working.
Wireless Outdoor Models
When you shop for options, explore outdoor wireless models. They’re close to what an indoor camera is, except that they are weather-resistant. The models also tend to be larger, making them easier to spot. That also helps as the sight of CCTV cameras is often enough of a deterrent for most criminal elements that might target your home. A security camera that’s big and visible can easily discourage them from going through with any plans they might have that involve compromising your home’s security.
Wire-Free Outdoor Cameras
Wireless security cameras are often powered by batteries. They don’t need to be plugged in, but the limited power means their recording time is limited. As for features, they have the same features as wireless cameras. Some wireless cameras can be attached to a solar panel, though. That can keep the batteries charged, so you won’t have to worry about your CCTV system dying on you when you need it. You never know when emergencies might develop, so ensuring that your outdoor cameras keep running 24/7 will help in your efforts to keep your household safe.
Floodlight Cameras
Floodlight cameras are outdoor wireless CCTV systems. When the cameras are turned on, the lights are on, too. This feature helps scare off criminal elements. The lights also help ensure that the cameras receive a clear video feed. The lighting can be powered by an outlet or an existing lighting wire. Get a professional to handle the task for you to prevent any mistakes. Any errors in the installation process could compromise your CCTV systems or light. An expert will know how to get this right. They have the tools, skills, and experience to ensure a speedy, error-free installation.
Video Doorbells
Aside from cameras, you’ll want to install a video doorbell, too. It’s helpful to have a record of anyone who tries to get through your front door. Also, these security systems have the helpful feature of allowing you to talk to and communicate with people on the other side of the screen. That way, if you have a package coming in and no one is home, you can inform the delivery personnel where they can hide it so it would be safe from potential burglars. Many homes have witnessed burglars taking off with the packages left on their yards, front doors, and porches, so having a video camera to record everything will help keep your packages safe from these criminal elements.
Should You Get a Home Security Camera?
If you have security concerns, upgrading your home security with CCTV systems is a smart move. Decide whether to go for indoor or outdoor systems or both. That way, you can protect the perimeter of the property and your family inside the home. If you have privacy concerns about indoor cameras, though, explore outdoor models. If you have pets or kids, though, an indoor camera will ensure that you can look in on them any time, day or night. That’s one way to keep your loved ones safe even when you’re not home. They also come in handy if an intruder gets inside or if there’s a storm. The cameras let you know what’s happening, so you can be sure your household is safe.
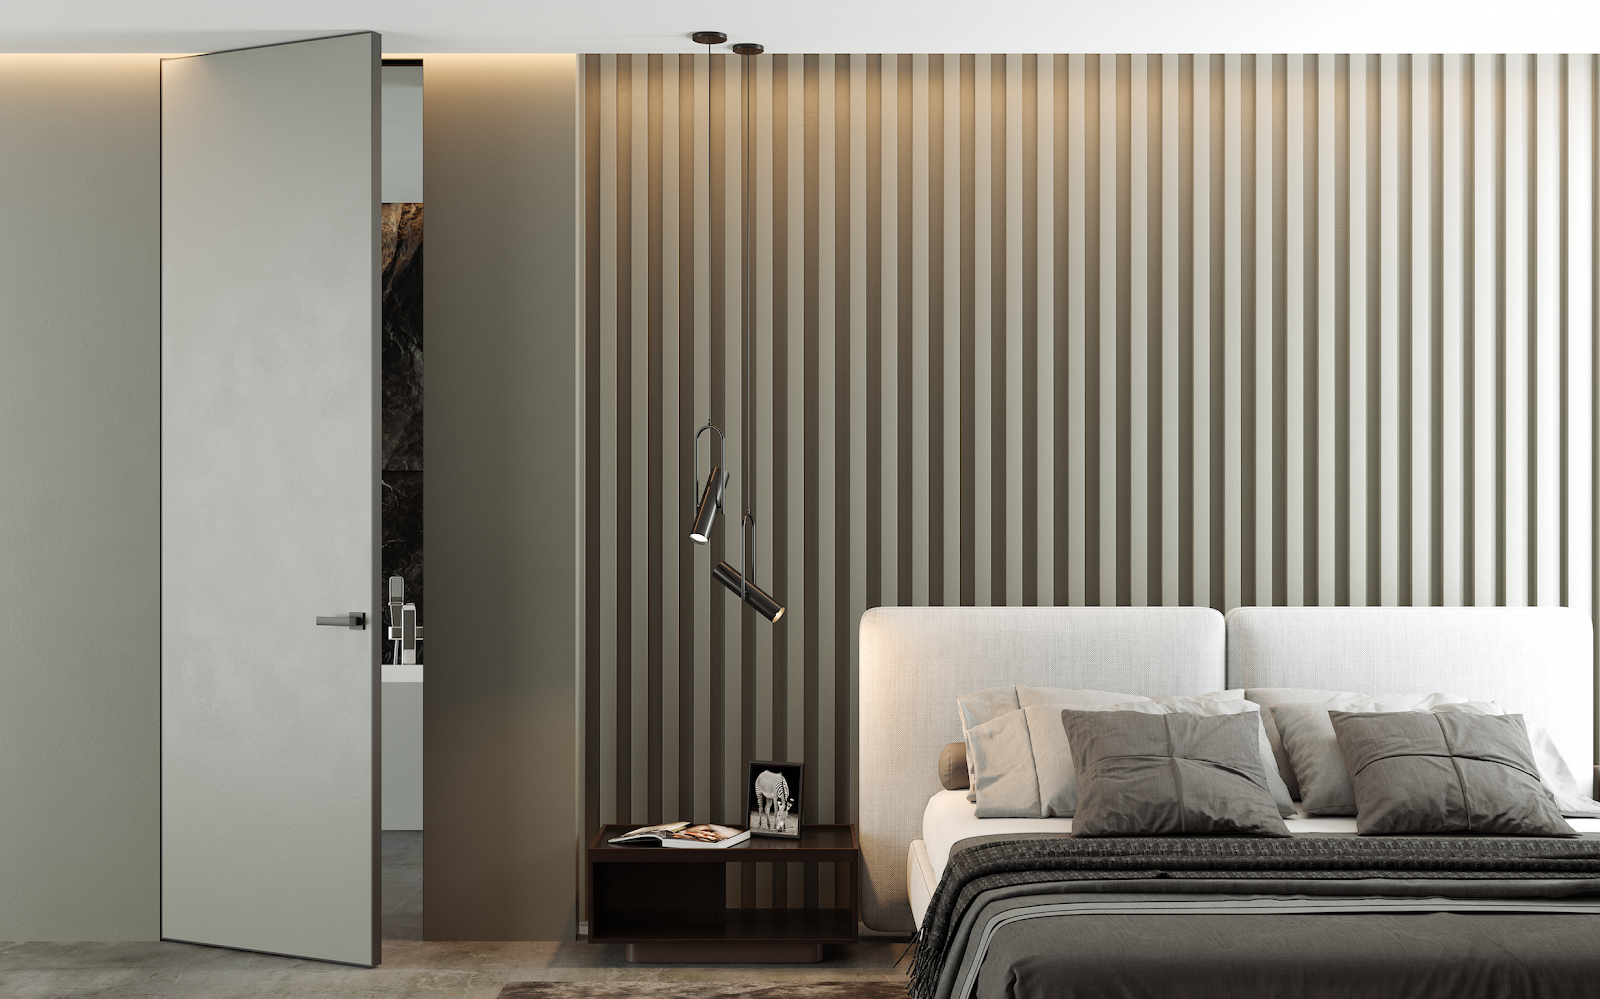
Choosing contemporary doors interior is a vital aspect of modern home design, offering both functionality and a stylish touch. These doors are more than just functional elements; they can significantly enhance the look and feel of your living spaces.
In this guide, we will explore different types of contemporary interior doors, their benefits, and what to consider when selecting the perfect doors for your home. We’ll also highlight TrioDoors door stores in Toronto, a leading provider of high-quality interior doors.
Exploring Types of Contemporary Interior Doors
Contemporary interior doors come in a wide range of styles and materials. Here’s a look at some of the most popular options:
- Panel Doors
- Modern Twist: Traditional panel doors updated with clean lines and modern materials.
- Variety of Configurations: Available in multiple panel configurations, such as two, four, or six panels.
- French Doors
- Elegance and Light: Glass panels allow for the flow of natural light, enhancing the sense of space.
- Contemporary Glass Options: Choose from frosted, tinted, or clear glass for a modern touch.
- Sliding Doors
- Space-Saving: Slide along a track, perfect for areas where space is limited.
- Modern Aesthetic: Commonly used in modern homes for closets, bathrooms, and as room dividers.
- Pocket Doors
- Hidden Design: Slide into the wall cavity, making them virtually invisible when open.
- Ideal for Small Spaces: Great for rooms where a swinging door would be impractical.
- Barn Doors
- Rustic Meets Modern: Mounted on a sliding track, combining rustic charm with contemporary design.
- Statement Piece: Acts as both a functional door and a focal point in any room.
Key considerations when choosing contemporary interior doors
- Material Selection
- Wood: Classic look, customizable with various finishes and stains.
- MDF (Medium-Density Fiberboard): Smooth, easy to paint, and more affordable than solid wood.
- Glass: Perfect for allowing light flow while maintaining a modern aesthetic.
- Metal: Durable, often used in industrial or modern designs.
- Style and Design
- Consistency: Ensure the door style matches your home’s overall design theme.
- Functional Needs: Consider the specific purpose and requirements for each door.
- Size and Measurements
- Standard vs. Custom Sizes: While most doors come in standard sizes, custom options are available for unique spaces.
- Accurate Measurements: Proper measurement of the door frame is crucial to avoid fitting issues.
- Hardware and Accessories
- Handles and Knobs: Choose hardware that complements the door style and home decor.
- Hinges and Tracks: Ensure hardware is durable and functional for the chosen door type.
- Installation
- Professional Installation: For best results, consider professional installation.
- DIY-Friendly Options: Some doors are designed for easy DIY installation.
Selecting the right contemporary doors interior is essential for achieving both functionality and a modern aesthetic in your home. From sleek flush doors to elegant French doors, the choices are vast and varied. When choosing interior doors, consider factors such as material, style, size, and installation requirements to ensure they meet your needs.
For quality and reliability, purchase your contemporary interior doors (https://triodoors.ca/interior-doors/) from reputable suppliers like TrioDoors door stores in Toronto. It offers a wide selection of high-quality doors that cater to various styles and budgets, ensuring you find the perfect doors for your home.
Enhance your living space today with the ideal contemporary doors interior!
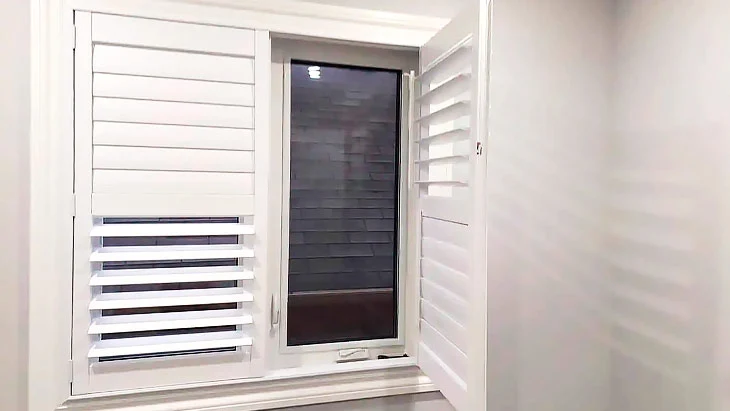
In Toronto with its population density, a large number of residents do care about privacy. This is why Vinyl Light gets lots of requests for California shutters Toronto area.
What Are California Shutters
California shutters are a form of interior window covering that is usually made of wood or composite materials. They are sometimes referred to as plantation shutters or just shutters. To adjust light and privacy, they have large slats that may be tilted open or closed.
These shutters, which are installed inside window frames, are renowned for their strength, beauty, and capacity to improve sound absorption and insulation in a space. They give windows in homes and businesses a traditional, refined appearance, and they are well-liked for their timeless design and usefulness.
Features of California Shutters
California shutters’ primary advantages are:
- Beauty. They provide any area with a classic, ageless look that enhances its overall charm.
- Light control. California shutters let you control the amount of natural light that enters your room, giving you freedom and ambiance.
- Privacy. Because they offer such remarkable solitude, they are ideal for baths and bedrooms.
- Energy efficient. By keeping your home warm in the winter and cool in the summer, the insulation they offer may help you save money on your energy bills.
- Resilience. California shutters are robust and durable.
- Easy maintenance. They are easy to maintain, requiring only the occasional wipe down with a damp cloth.
- Increase the value of your property. Installing California shutters could increase the value of your home because many purchasers believe them to be a desired feature.
California vs. Plantation Shutters

Depending on your unique requirements, tastes, and the design of your house, you can choose between plantation and California shutters.
- Window size. California shutters may look more proportionate on smaller windows and larger windows. Plantation shutters can improve the appearance of larger windows.
- Room style. Take into account the room’s general design and aesthetic. Plantation shutters complement modern or contemporary decor, while California shutters work well with traditional décor.
- Budget. Since plantation shutters may cost more, it may be a determining factor.
- Needs for light and privacy. Consider the degree of light and privacy control that you require. Both types of shutters offer good privacy.

Washing machine repair is a crucial skill for homeowners seeking to maintain the functionality of their household appliances. One common issue that plagues many households is a noisy washing machine.
The incessant clunks, bangs, or rattles emanating from the appliance can be both annoying and indicative of underlying problems. Luckily, resolving the noise problem typically requires simple repairs achievable with basic tools and some basic knowledge.
This thorough guide will guide you through a systematic troubleshooting and Whirlpool washing machine repair process, guaranteeing your washing machine operates smoothly and silently for an extended period.
Understanding the Source of the Noise
Prior to delving into the repair procedures, it is crucial to pinpoint the origin of the noise. Various factors, including loose components, worn-out parts, or incorrect installation, can contribute to the noises emanating from washing machines.
Take the time to carefully listen to the machine during different stages of the washing cycle, noting when the noise occurs and any specific patterns. This initial assessment will help you pinpoint the root cause, making the repair process more efficient.
Step 1: Inspecting for Loose Items
Begin the troubleshooting process by checking for loose items inside the washing machine drum. Coins, buttons, or small objects may have become lodged in the drum’s crevices, causing unusual noises during the spin cycle. Carefully inspect the drum, removing any foreign objects that may be contributing to the racket.
Step 2: Tightening Loose Fasteners
Noisy washing machines often result from loose nuts, bolts, or screws. Employ a wrench or screwdriver to secure any apparent fasteners on the machine, with specific attention to areas like the drum, motor, and support brackets. Ensure all components are securely fastened to eliminate unnecessary vibrations and noises during operation.
Step 3: Checking for Damaged Drum Bearings
Worn-out drum bearings are a common culprit for persistent washing machine noise. To inspect the bearings, manually rotate the drum to feel for any roughness or resistance. If the bearings are damaged, they may need replacement. We will lead you through the steps to safely remove and replace these essential components.
Step 4: Balancing the Washing Machine
Uneven distribution of the load can result in excessive noise and vibration. Verify whether the load is evenly distributed within the drum. If not, redistribute the clothes to achieve a balanced load. Additionally, ensure that the washing machine is level on the floor. Adjust the leveling legs as needed to eliminate any rocking or tilting during operation.
Step 5: Examining the Drive Belt
A loose or damaged drive belt can contribute to a noisy washing machine. Examine the belt closely for any indications of wear, cracks, or looseness. If any issues are detected, follow our guide to safely replace the drive belt, ensuring smooth and quiet operation.
Step 6: Lubricating Moving Parts
Proper lubrication is essential for reducing friction and minimizing noise in moving parts. Apply a suitable lubricant to components such as the motor bearings and pulleys. This simple step can make a significant difference in the overall noise level of your washing machine.
Step 7: Evaluating the Shock Absorbers
Washing machines are equipped with shock absorbers to dampen vibrations during the spin cycle. Inspect these elements for any visible signs of wear or damage. If necessary, replace the shock absorbers to restore their effectiveness in reducing noise and vibration.
Safety Precautions
- Turning Off Power and Water Supply Before Any Repair:
- Power Supply: Disconnect the washing machine from the electrical outlet to prevent the risk of electric shock during repairs.
- Water Supply: Shut off both the hot and cold water supplies connected to the washing machine to prevent potential water leakage during maintenance.
- Handling Washing Machine Components with Care During Troubleshooting:
- Caution with Moving Parts: Exercise caution when manually rotating the drum or handling moving components to prevent injuries.
- Wear Protective Gear: Depending on the nature of the repair, it is advisable to wear suitable protective gear, such as gloves or safety glasses.
- Secure the Machine: If required to tilt or move the washing machine, ensure it is properly secured to prevent tipping or falling.
- Follow Manufacturer Guidelines: Adhere to the guidelines and instructions provided by the manufacturer for the safe troubleshooting and repair processes.
By incorporating these regular maintenance practices and adhering to safety precautions, you can not only address existing noise issues but also prevent future problems, ensuring the longevity and efficient performance of your washing machine.
Regular Maintenance Practices
- Tips for Preventing Future Noise Issues:
- Load Balance: Ensure that the laundry load is consistently distributed within the drum, preventing imbalance during the spin cycle.
- Check Pockets: Before loading clothes, ensure there are no loose items such as coins, buttons, or small objects that could cause noise.
- Proper Installation: Make sure the washing machine is leveled and stable on the floor, minimizing vibrations during operation.
- Use the Right Detergent: Follow the manufacturer’s recommendations for the type and amount of detergent to prevent excessive suds that may contribute to noise.
- Inspect Hoses: Regularly examine both the water inlet and drain hoses for any kinks, leaks, or damage that could result in noise or operational problems.
- Cleaning and Maintaining the Washing Machine for Optimal Performance:
Routine cleaning is vital to prevent the accumulation of dirt, debris, and detergent residues, which can impact the performance of your washing machine. Consult the table below for a detailed guide on cleaning and maintaining various parts of the washing machine:
| Component | Cleaning Procedure | Frequency |
| Detergent Drawer | Remove and clean the detergent drawer. | Monthly |
| Door Seal | Use a damp cloth to wipe the door seal, eliminating dirt and mold. | Monthly |
| Drum | Initiate a hot water cycle with vinegar to effectively eliminate any residue buildup. | Every 2-3 months |
| Filter/Pump | Clean the filter or pump to remove lint and debris. | Every 3-6 months |
| Exterior | Wipe down the exterior with a mild detergent solution. | As needed |
Successfully repairing a noisy washing machine involves a systematic approach to identify and address the root cause of the issue. By adhering to these detailed instructions, you can rejuvenate your washing machine, restoring it to optimal performance.
This process will effectively eliminate disruptive noises, ensuring the longevity of your appliance. Regular maintenance and timely repairs will not only enhance the efficiency of your washing machine but also contribute to a quieter and more peaceful laundry experience.

Transform Your Home with Contemporary Doors Interior: A Modern Aesthetic

Best Place to Buy California Shutters in Toronto and Things to Know
Secrets of Effective Digital Marketing for Small Firms

4 Reasons You Should Care about Your Credit Score

How Has E-commerce Evolved?

Wheelchairs: Types, Functions, Advantages, and Recommendations for Choosing

8 Tips for Better Product Consistency
-
 Captions3 years ago
341 Sexy Captions to Fire Up Your Instagram Pictures
-
Captions3 years ago
311 Night Out Captions for Instagram and Your Crazy Night
-
Captions3 years ago
245 Saree Captions for Instagram to Boost Your Selfies in Saree
-
Captions3 years ago
256 Best Ethnic Wear Captions for Instagram on Traditional Dress
-
Captions3 years ago
230 Blurred Picture Captions for Instagram
-
Captions3 years ago
275 Deep Captions for Instagram to Express Your Thoughts
-
Quotes3 years ago
222 Nail Captions for Instagram to Showcase Your Fresh Manicure
-
Captions3 years ago
211 Laughing Captions for Instagram | Laughter Is the Best Medicine